
In this post, we’re going to walk you through how to update your DNS records for your Showit website, using GoDaddy (It will look essentially the same with any domain host though – GoDaddy is just the one we personally use and recommend.) Don’t be intimidated! Updating a DNS record is simply entering the right info (that someone else gives you!) into the right box + hitting save.
You’ve totally got this!
A step-by-step tutorial walking you through how to update your DNS records for your Showit website
First things first, why do you even need to update your DNS records?
A few reasons, really – the most important one being you need your DNS records set up correctly in order to actually launch your brand new Showit website!
You may also need to update your DNS records to create a branded email address using Google Workspace or verify your website on Pinterest.
Where to find your DNS records
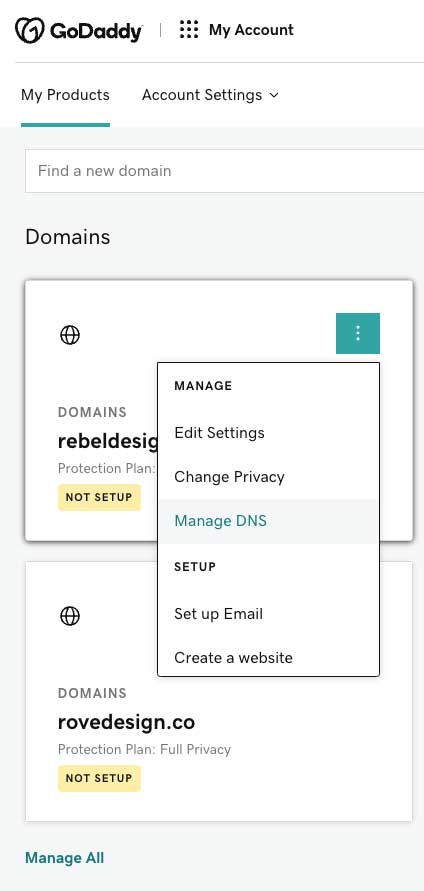
- GoDaddy: from the My Products page, find the domain you’d like to update, click the three dots icon in the top right corner of the card, and select “Manage DNS.”
- Namecheap: from your Domain List, find the domain you’d like to update and click the “Manage” button to the right. Then, select the “Advanced DNS” tab.
- Google Domains: select the domain you’d like to update, then select Menu > DNS at the top left. More detailed instructions are available here. Be aware that Google also refers to DNS records as “resource records.”
How to get the correct DNS records from Showit
Don’t be intimidated! Updating a DNS record is just entering the right info (that someone else gives you!) into the right box + hitting save.
After you submit your custom domain request in Showit, you’ll receive a message from Showit with your DNS records. You can find this message in your support chat (the question bubble icon in the bottom right corner of the Showit app) or in your email inbox.
Here’s an example of the message Showit will send you:
“——- ACTION REQUIRED ——-
A Records:
A record for @ pointing to -> AA.AAA.AAA.AAA
A record for * (wildcard) pointing to -> BB.BBB.BBB.BB
A record for www pointing to -> CC.CCC.CCC.CCC
⚠️ Please let us know when these records have been applied so we can validate the DNS to install an SSL certificate and avoid potential downtime on your site.”
In real life, A/B/C from the example above will be replaced with strings of numbers – be sure to copy/paste them exactly.
After you’ve got these records, it’s time to update!
Updating your DNS records in GoDaddy

- In the “Type” field, you’ll choose “A”.
- In the “Name” field, you’ll enter “@”, “*”, or “www”, depending on which record you’re working on.
- In the “Value” field, you’ll enter the address Showit sent you – in the example above, it would be AA.AAA.AAA.AAA for your @ record, BB.BBB.BBB.BB for your * record, and CC.CCC.CCC.CCC for your www record.
- You can leave the “TTL” field as Default.
- Hit the Add Record button, and move on to the next record!
Once you’ve entered all of the DNS records that Showit provided, respond to the Showit support team via email or chat to let them know that you’ve completed these steps and ask them to apply your security certificate. Be patient! It can take anywhere from a few minutes up to 24-48 hours to update across the internet.
And you’re done!